After a long, cold winter in many parts of the country, freeze damage is a serious concern for commercial and industrial heating coils, as well as for cooling coils. Standard steam coils and hot water coils can freeze during extreme low temperatures while performing their heating functions. Plus, out-of-service chilled water coils that were not completely drained in the fall can also easily freeze in winter, causing tubes to burst and leak.
While freezing can cause complete coil failure, it is more likely that damaged coils will continue to function with minor, or even major, leaks. These leaking coils will not only deliver reduced performance, but can also be the cause of serious water damage, not to mention the buildup of mold and mildew. So it’s important to understand how to identify potentially hidden leaks in both heating and cooling coils.
The dangers of leaking heating coils
Detecting a leak in a commercial or industrial heating coil is critical to prevent energy loss, equipment damage and safety hazards. In steam coils or hot water coils, a leak introduces unintended moisture into the airstream or process environment. Steam escaping as vapor, or water dripping from a coil, adds humidity to the system.
Leaks in industrial process heating systems – especially where humidity control is critical – can significantly affect performance. Whether you’re dealing with steam coils or hot water coils, a leak disrupts not just heat delivery but also the delicate balance of temperature and moisture required for processes like drying, curing, or pharmaceutical manufacturing.
If the process demands precise relative humidity (RH), an unexpected moisture influx due to a leaking coil can push RH out of spec. Too much humidity risks product defects, while too little can mean excessive drying out of materials. For example, in a paper drying process, a leaking steam coil could oversaturate the air, leaving paper soggy or unevenly cured.
The signs to look for in steam coils and hot water coils
Visible steam or moisture – Steam escaping from a steam coil can be visible as a white plume or vapor cloud, especially near seams, joints, or tube ends. You might also see condensation or water pooling around the unit. A breach in the coil’s tubing or joints allows pressurized steam to escape, cooling and condensing into visible vapor or liquid.
Drop in system pressure – A noticeable decrease in steam pressure readings downstream of the coil can be a sign of a coil leak. Steam escaping the coil reduces the pressure available to the system, forcing it to work harder to compensate. Comparing current pressure readings to historical data can reveal a coil leak when a consistent drop occurs without another explanation, such as a valve issue.
Reduced heating performance – If a heating system fails to maintain desired air or process temperatures, a leaking steam coil or hot water coil could be the reason. Coil leaks result in less thermal energy being transferred, reducing system efficiency. If temperatures aren’t where they need to be, it’s time to take a closer look at your heating coils.
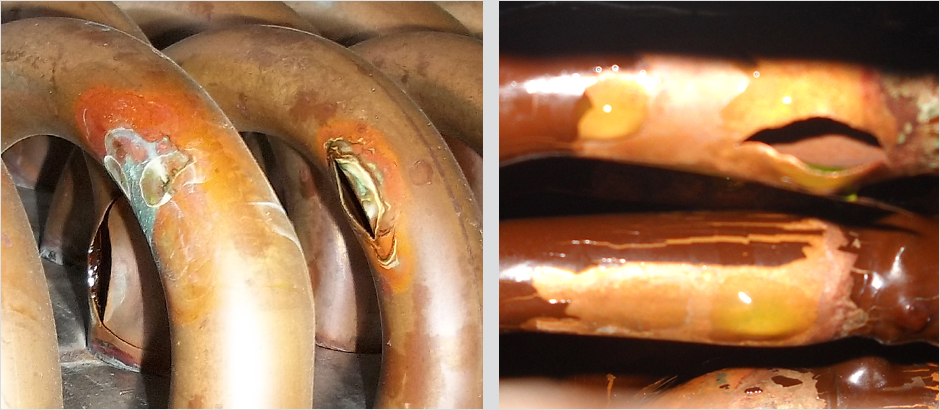
Corrosion or scale buildup – Another sure sign of a coil leak is rust, pitting or white mineral deposits on the coil’s exterior, particularly at joints, fins or tube bends. Leaking moisture and dissolved solids will deposit and corrode metal surfaces over time. So be sure to inspect hard-to-reach areas with a flashlight to find hidden leaks.
Increased condensate production – In steam coils, steam escaping inside the unit condenses prematurely, adding to the condensate load instead of transferring heat effectively and resulting in excessive water in the condensate return line or drip pans. Check for these signs, and also watch for frequent cycling of condensate pumps.
Higher energy costs – If you notice an unexplained spike in energy bills (without a corresponding increase in demand), it could be because the system is working harder to make up for a decline in performance due to a coil leak. Again, small leaks can cause small performance reductions that can go unnoticed, but they can really add up over time.
Potential problems with leaking cooling coils
Many of the problems caused by leaking cooling coils are similar to those resulting from damaged heating coils, including performance and energy efficiency losses, water damage to the building and other equipment, as well as other issues with moisture buildup, such as the development of mold and mildew.
Whether it’s chilled water coils or refrigerant coils, the warning signs discussed above are also applicable, just with the function of the coils reversed from heating to cooling. So we will mention a few below without going into great detail.
Signs of leaking chilled water coils or glycol coils
Water or glycol pooling – The most obvious signs of leaking cooling coils are puddles, drips or dampness under and/or around the coil. A key difference here compared to heating coils is that when glycol is present, the moisture on the floor can be slippery, creating a safety hazard.
Reduced cooling efficiency and higher energy costs – Lost fluid reduces the cooling coil’s heat transfer capacity, resulting in insufficient cooling output. Just like with a heating coil, the system must then work harder to maintain desired temperatures, increasing energy consumption and costs.
Corrosion or staining – Leaking water/glycol reacts with metal surfaces, especially when untreated, creating rust, green copper oxide or white deposits on the coil exterior where the liquid escapes. These are usually easy to spot with a simple visual inspection of the cooling coils.
Air in the system – Because a leak will allow air to enter the closed loop cooling system, common signs can be gurgling noises, cavitation in pumps and air bubbles visible in sight glasses. Air in the system will disrupt water or refrigerant flow and reduce heat transfer.
Practical, simple steps to identify or confirm a leak
Identifying a heating or cooling coil that has a leak typically isn’t difficult. It just requires consistent effort, especially after a cold winter where freeze damage is a possibility. A couple of simple steps include:
Visual inspection – Just look for the obvious signs described above: steam escaping, water pooling, corrosion, etc.
Pressure test – Isolate the coil and pressurize it with air or steam, checking for drops in pressure or audible leaks. You can also use soapy water on joints and look for bubbles.
Of course when you do find a leaking coil that needs to be replaced, whether it’s a hot water coil, chilled water coil, steam coil, refrigerant coil, or any other type, Marlo can get you a replacement fast!
Email Registration
Please complete the form below to sign up for our Marlo Messenger newsletter and other email communications.
The signs to look for in steam coils and hot water coils
"*" indicates required fields